
Deploying Ghost CMS on AWS EC2: Automating Server Start-up and DNS Updates with Lambda and Netlify
April 10, 2024

Tamilarasu Gurusamy
AWS Hands On
2 / 2 Parts
Objective
- Ghost CMS is a free, self-hosted platform for managing blogs and newsletters.
- While typically running 24/7, it doesn't require constant operation for occasional use.
- This guide focuses on automating Ghost's startup and shutdown to minimize costs and streamline workflows for self-hosted users.
Since the EC2 will be turned off for most of the time, it is advised to load the images in Cloudinary insted of local storage in Ghost, that way even when the instance is off, the images will still be loading from cloudinary Also, setting up the Ghost CMS is out of scope for this post, instead here is the post you are looking for.
Website Architecture
- The website build process will be on Netlify
- Ghost will be providing the API required when the website needs to be built
- For more information on how to build a blog using netlify and Ghost CMS, refer to this blog series
Tasks
Create roles for the Lambda functions
- We need to create three different roles with three different permissions
snap-and-delete-volume-rolecreate-volume-start-instance-rolecreate-a-record-role
- These roles will then be attached to the respective lambda functions granting them access to various services
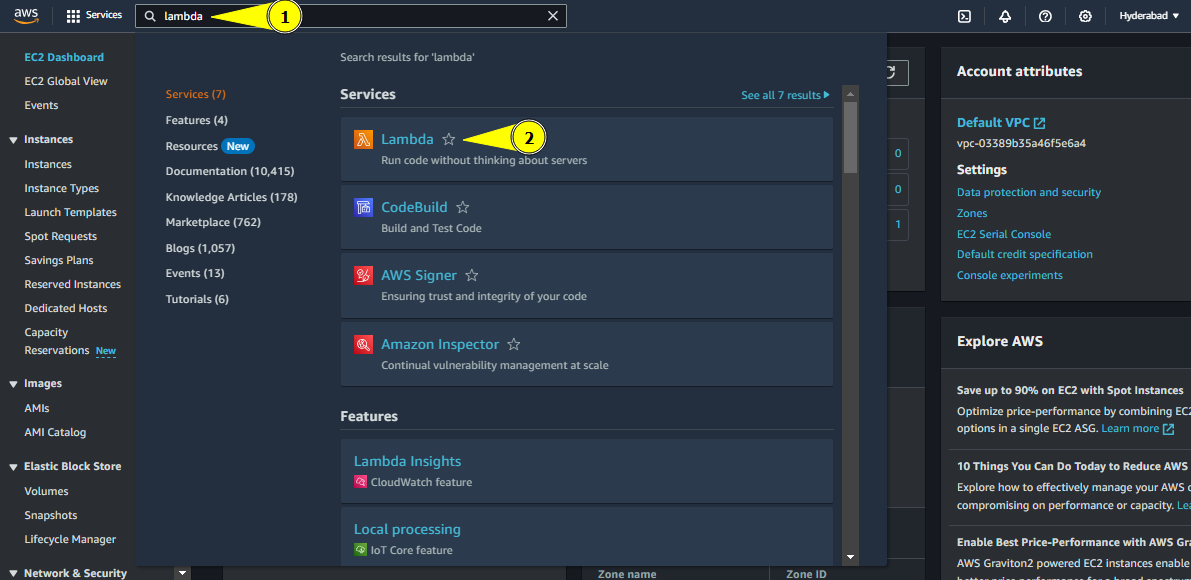
Create
snap-and-delete-volume-roleNavigate to IAM
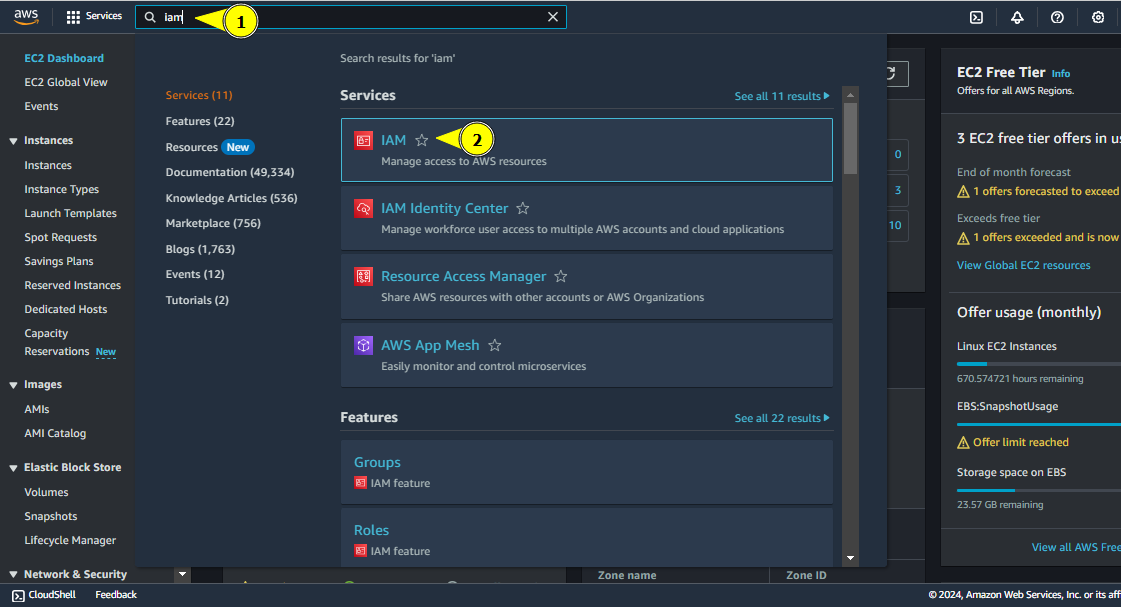
Navigate to IAM
Click on Roles

IAM Service Page
Click on Create role

Create role button
Keep the Trusted entity type as AWS Service.
- Choose Service or use case as Lambda
- And click Next
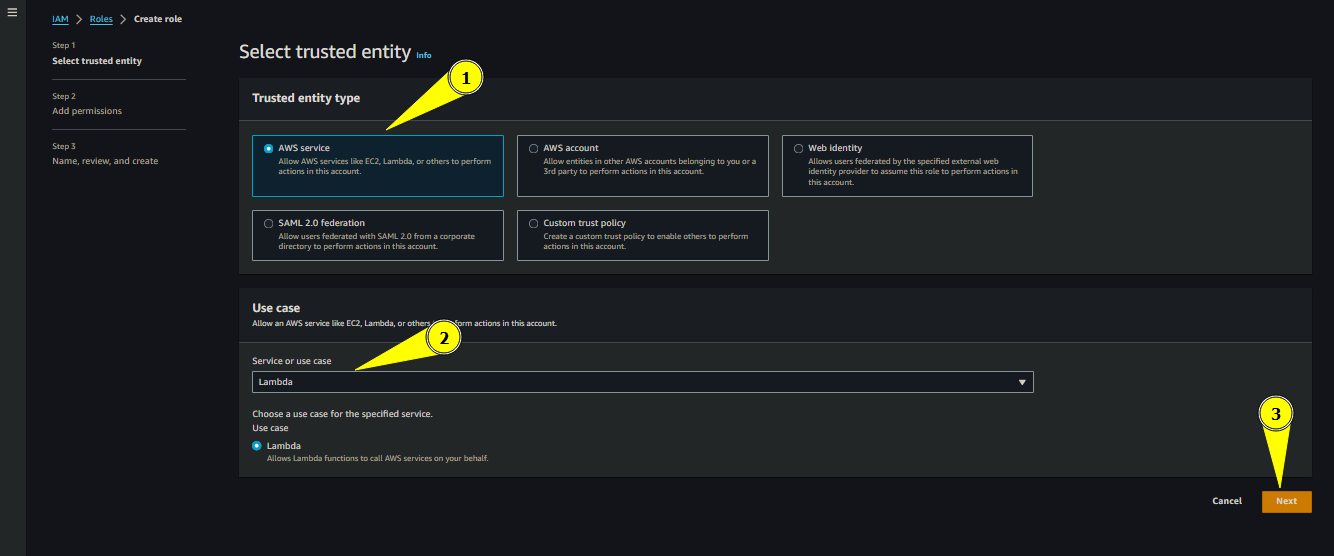
Creating Role
We will choose the policies later, for now click next
Policies Page
Give a name for the role, we will give
snap-and-delete-volume-roleand click Create role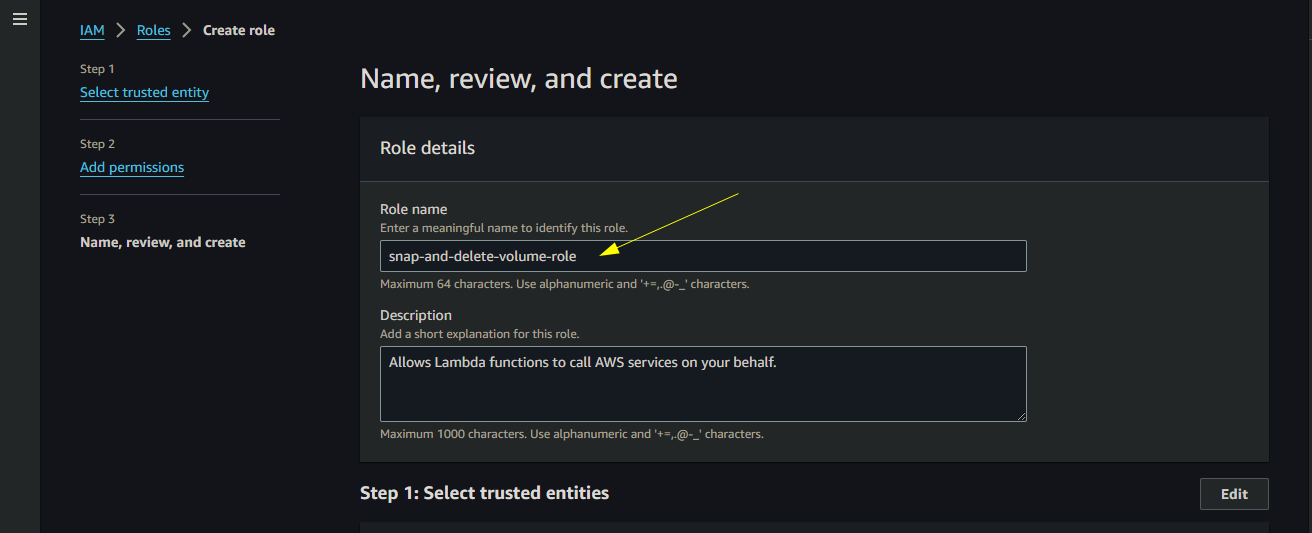
Role Name
Find and click on
snap-and-delete-volume-role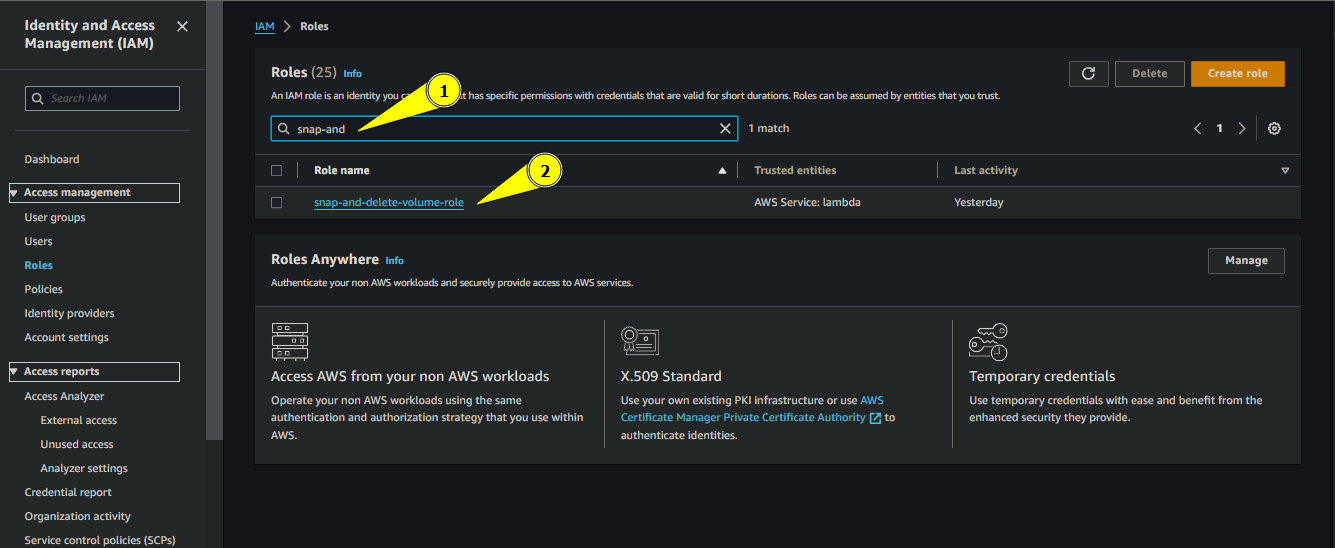
Search and click on Role
Click on Add permissions
- Choose inline policy

Creating Policy
- Choose inline policy
Choose JSON instead of visual
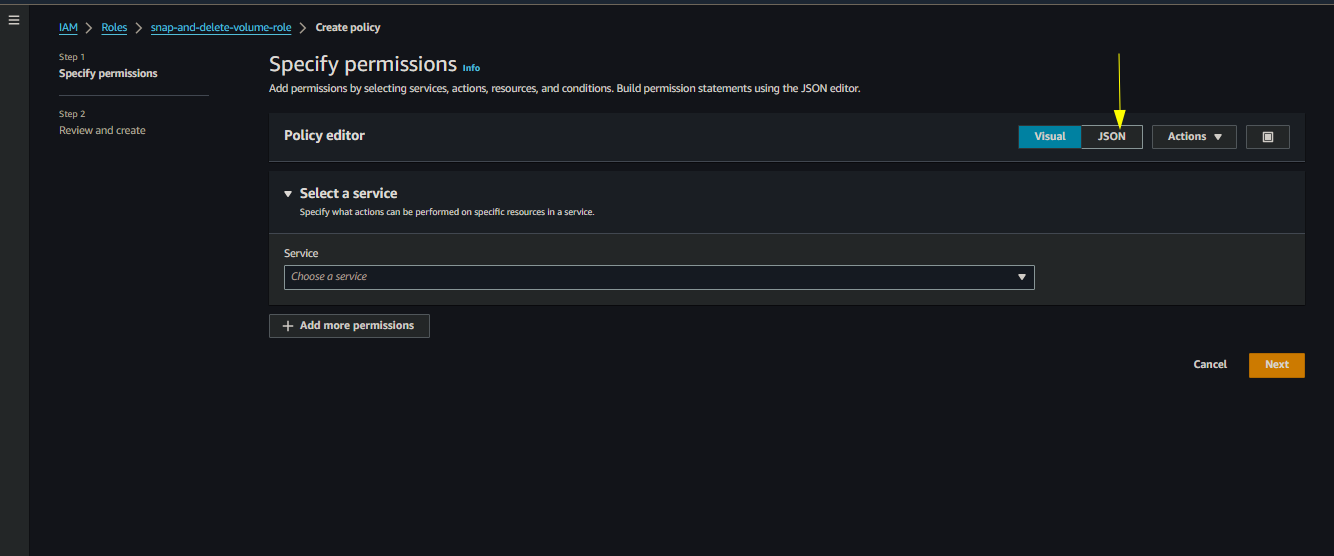
Choose JSON
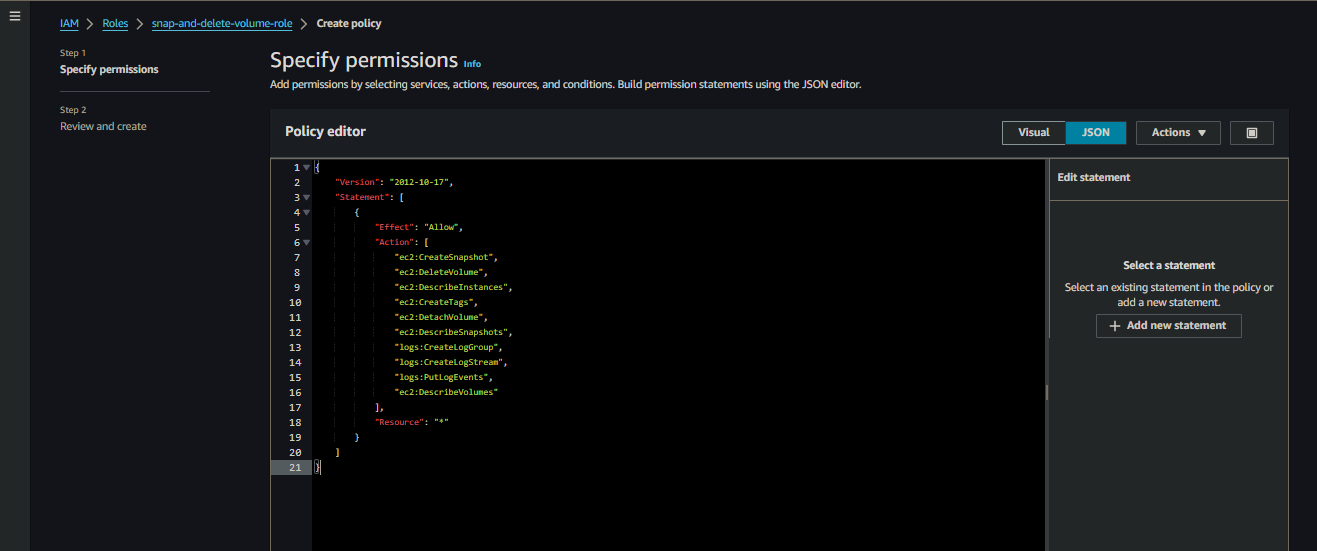
Paste the following code
			{
    "Version": "2012-10-17",
    "Statement": [
        {
            "Effect": "Allow",
            "Action": [
                "ec2:CreateSnapshot",
                "ec2:DeleteVolume",
                "ec2:DescribeInstances",
                "ec2:CreateTags",
                "ec2:DetachVolume",
                "ec2:DescribeSnapshots",
                "logs:CreateLogGroup",
                "logs:CreateLogStream",
                "logs:PutLogEvents"
            ],
            "Resource": "*"
        }
    ]
}
Paste the Code
Click Next after pasting the code
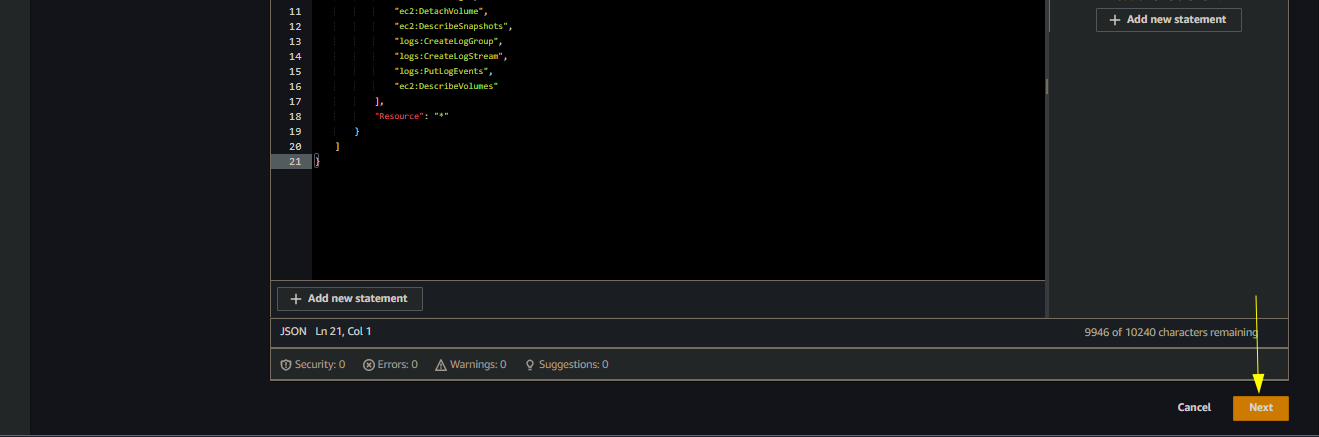
Click Next
Give a name for the policy, we will give
snap-and-delete-volume-policy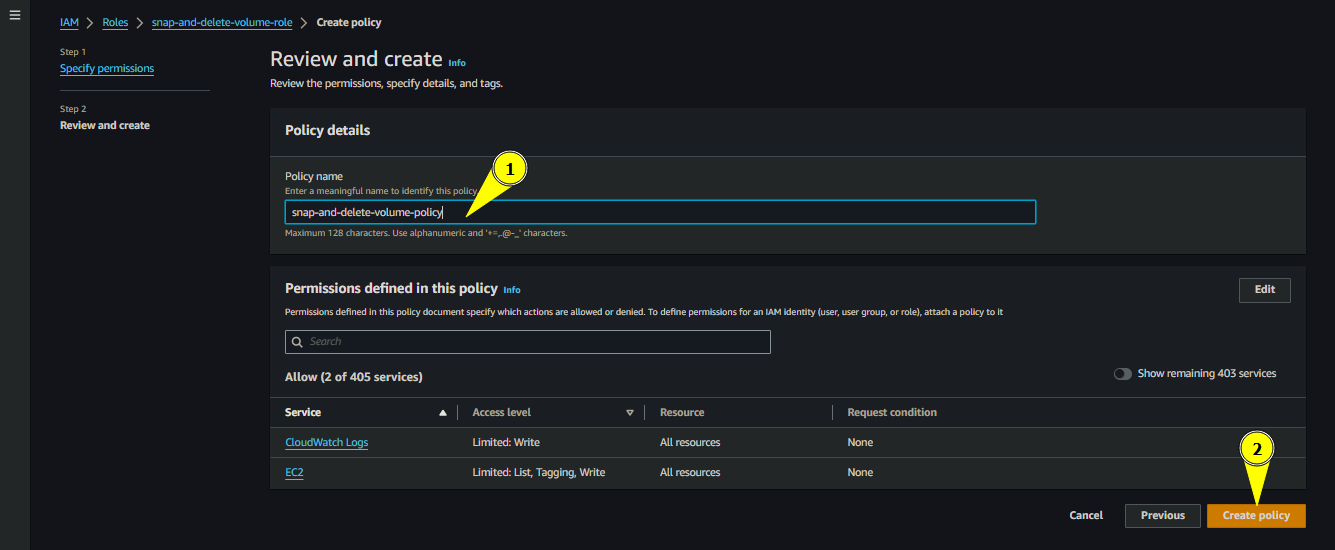
Name for the policy
- Create
create-volume-start-instance-role- Follow the same above steps to create a role, while replacing the role name

Role Name
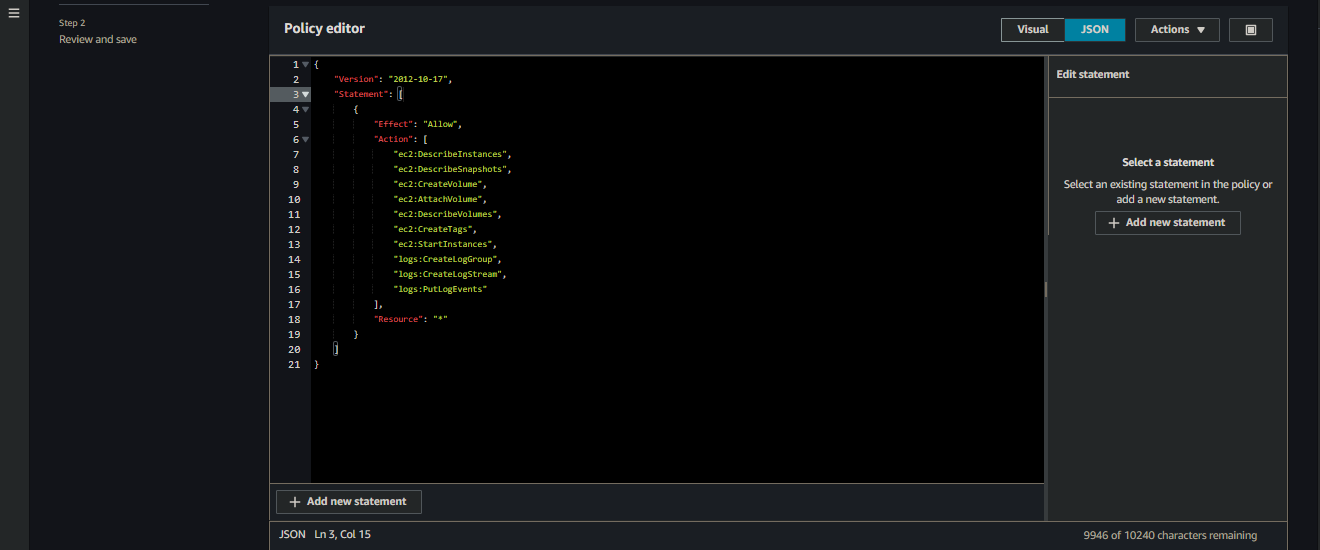
- Paste the following code for the inline policy
- Follow the same above steps to create a role, while replacing the role name
			{
    "Version": "2012-10-17",
    "Statement": [
        {
            "Effect": "Allow",
            "Action": [
                "ec2:DescribeInstances",
                "ec2:DescribeSnapshots",
                "ec2:CreateVolume",
                "ec2:AttachVolume",
                "ec2:DescribeVolumes",
                "ec2:CreateTags",
                "ec2:StartInstances",
                "logs:CreateLogGroup",
                "logs:CreateLogStream",
                "logs:PutLogEvents"
            ],
            "Resource": "*"
        }
    ]
}
Inline Policy
- Then continue with the rest of steps using previous procedure
- Create create-a-record-role
- Follow the same above steps while replacing the role name
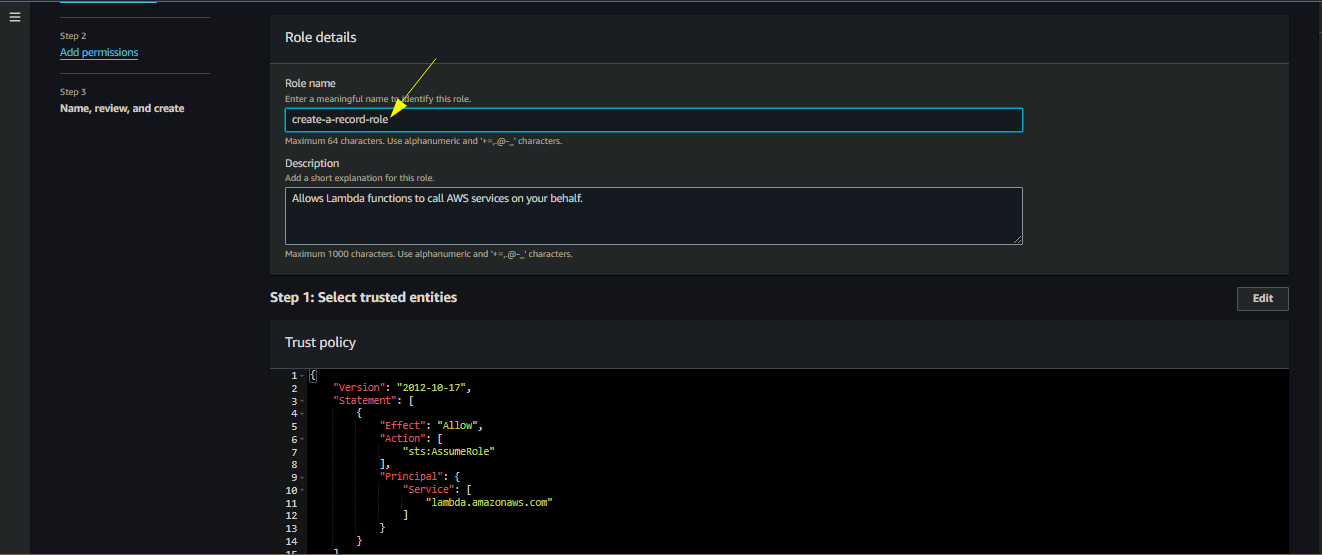
Role Name
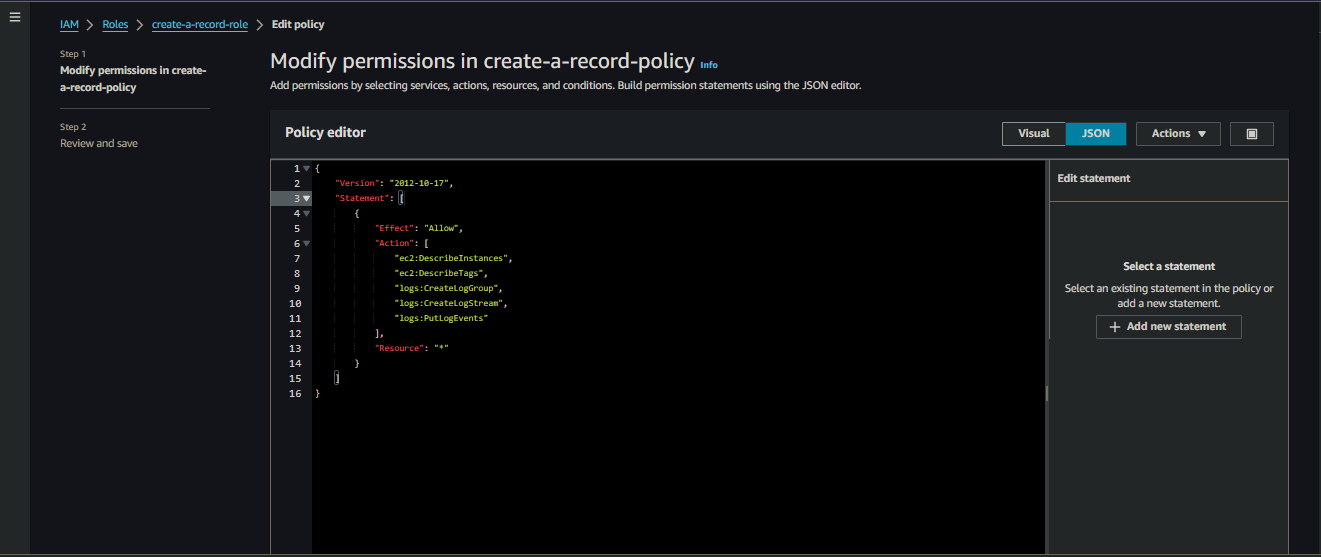
- Paste the following code for the inline policy
- Follow the same above steps while replacing the role name
			{
    "Version": "2012-10-17",
    "Statement": [
        {
            "Effect": "Allow",
            "Action": [
                "ec2:DescribeInstances",
                "ec2:DescribeTags",
                "logs:CreateLogGroup",
                "logs:CreateLogStream",
                "logs:PutLogEvents"
            ],
            "Resource": "*"
        }
    ]
}
Inline Policy
- Then continue with the remaining steps
Create a Snapshot, and Delete the Associated Volume
- This section we will deal with the steps when the instance is turned off
- Once the instance is turned off, an Eventbridge rule will trigger a lambda that will create a snapshot of the volume associated with the particular instance and delete the volume
Navigate to Lambda service page
Navigate to Lambda
Click on create function

Create function button
Keep the option of Author from scratch as it is
- Enter the function name. For simplicity we will name it
snap-and-delete-volume - Choose the runtime as Python 3.10
- Keep the architecture as x86_64
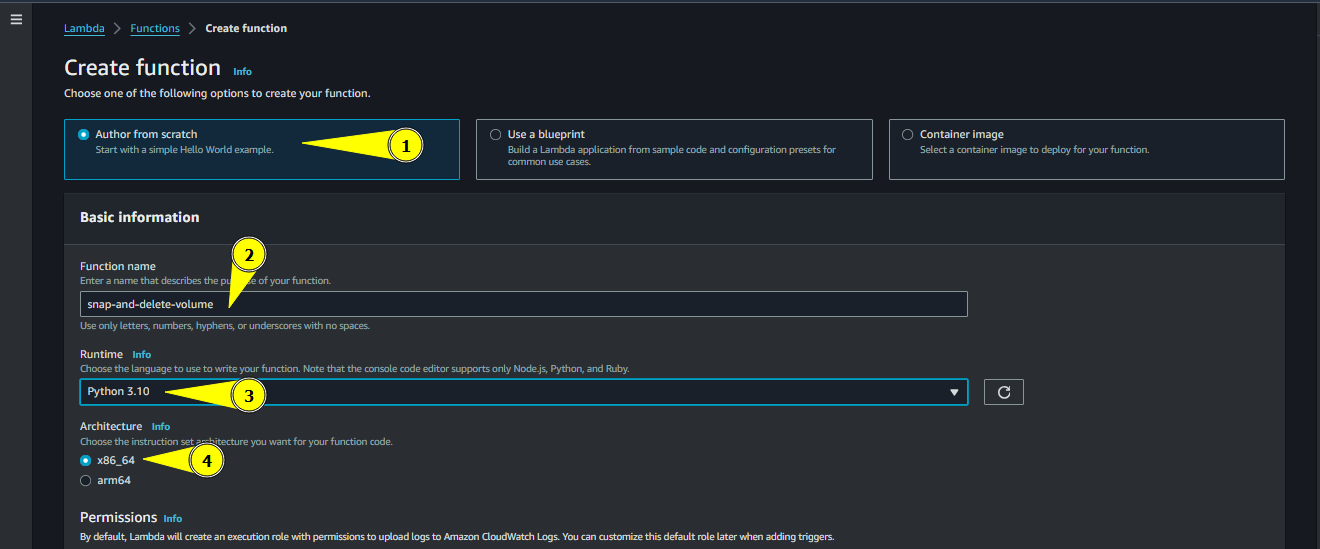
Creating Lambda Function
- Enter the function name. For simplicity we will name it
Choose the existing role named snap-and-delete-volume-role
- Click on create function

Creating Lambda Function
- Click on create function
Click on Configuration
- Click on Edit

Changing Configuration
- Click on Edit
Change the timeout time from 3 seconds to 30 seconds
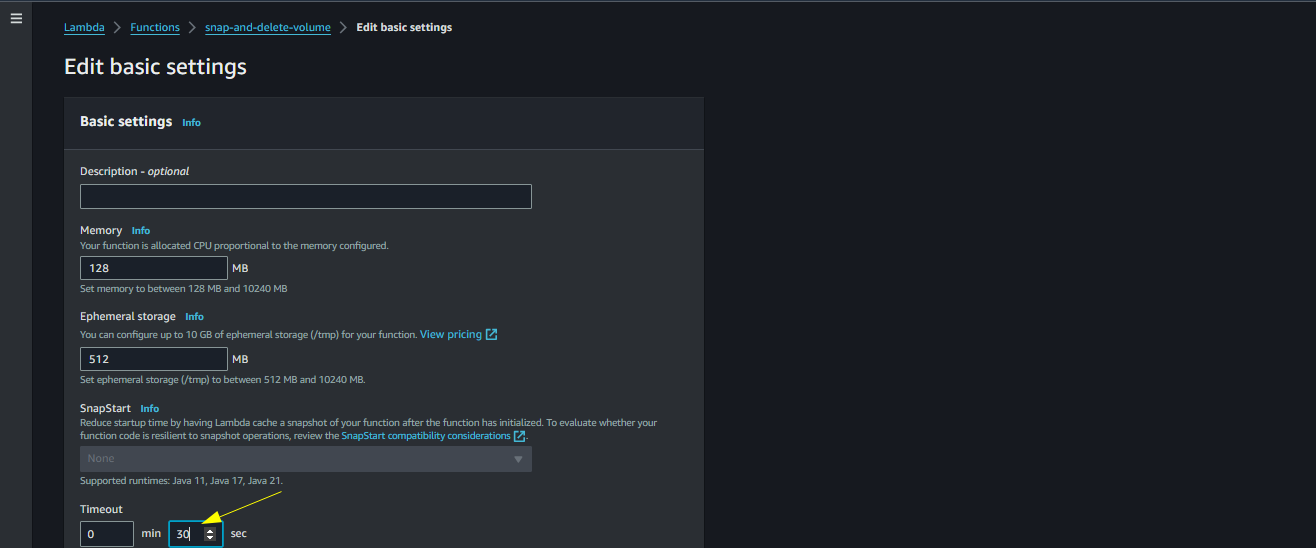
Change Timeout
Click Save

Click Save
Paste the following code in the Lambda Code and click Deploy
- Dont forget to change the relevant details like
instance_idandregion name
- Dont forget to change the relevant details like
			import boto3

ec2_client = boto3.client('ec2', region_name='ap-south-1')

tag_key = "ghost"
tag_value = "true"
instance_id = 'your-instance-id'

def get_root_volume_id(instance_id):
    # Describe instance
    response = ec2_client.describe_instances(
        InstanceIds=[instance_id]
    )

    # Get root volume ID
    root_volume_id = None
    for reservation in response['Reservations']:
        for instance in reservation['Instances']:
            for block_device_mapping in instance['BlockDeviceMappings']:
                if block_device_mapping['DeviceName'] == instance['RootDeviceName']:
                    root_volume_id = block_device_mapping['Ebs']['VolumeId']
                    break

    return root_volume_id

def create_snapshot_with_tags(root_volume_id):
    response = ec2_client.create_snapshot(
        VolumeId=root_volume_id
    )
    snapshot_id = response['SnapshotId']

    ec2_client.create_tags(
        Resources=[snapshot_id],
        Tags= [ {'Key': tag_key, 'Value': tag_value}]
    )

    print(f"Snapshot {snapshot_id} created and tagged successfully")

def detach_and_delete_volume(instance_id, root_volume_id):
    # Detach the volume from the instance
    response_detach = ec2_client.detach_volume(
        VolumeId=root_volume_id,
        InstanceId=instance_id,
        Force=True
    )

    print(f"Volume {root_volume_id} detached from instance {instance_id} successfully")

    # Wait for the detachment to complete
    waiter = ec2_client.get_waiter('volume_available')
    waiter.wait(
        VolumeIds=[root_volume_id],
        WaiterConfig={
            'Delay': 10,
            'MaxAttempts': 30
        }
    )

    # Delete the volume
    response_delete = ec2_client.delete_volume(
        VolumeId=root_volume_id
    )

    print(f"Volume {root_volume_id} deleted successfully")

def lambda_handler(event,context):
    root_volume_id = get_root_volume_id(instance_id)
    create_snapshot_with_tags(root_volume_id)
    detach_and_delete_volume(instance_id,root_volume_id)

Paste the code
Now navigate to Amazon Eventbridge service page
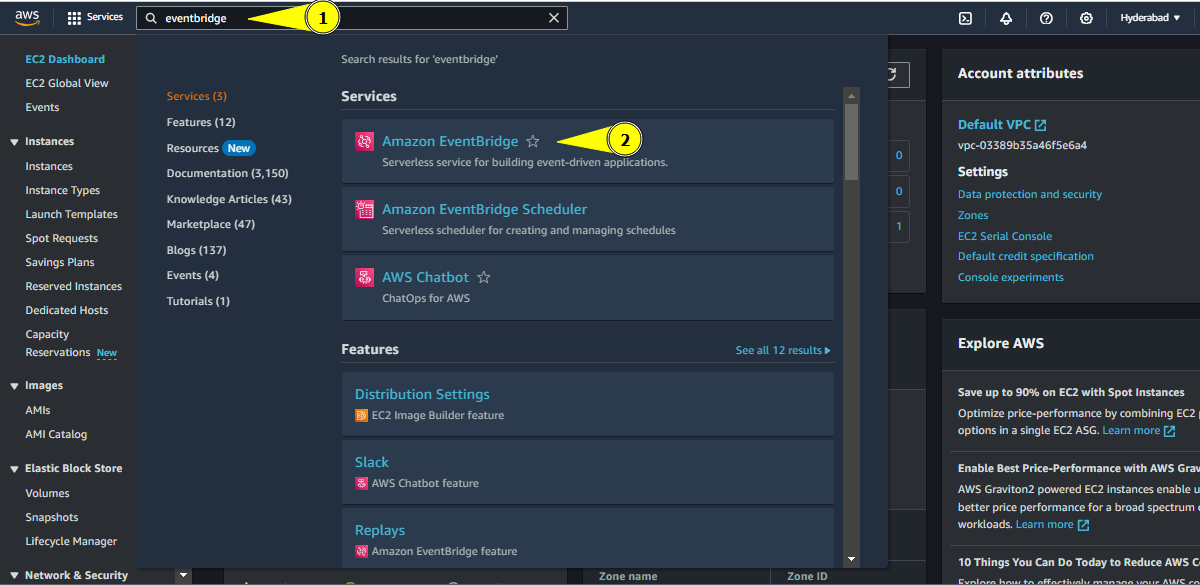
Navigate to Eventbridge
Click on Create rule

Create rule button
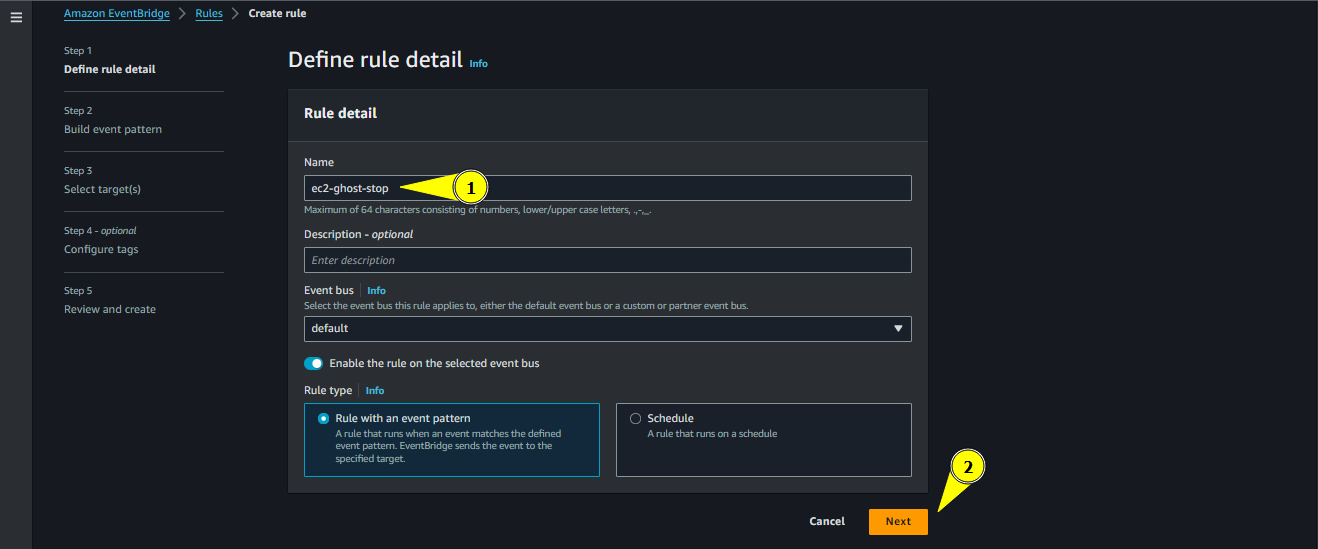
Give a name for the rule, for simplicity we will name it ec2-ghost-stop
- Give a description if you want
- Keep the rest options as the default ones
- Click Next
Creating Rule
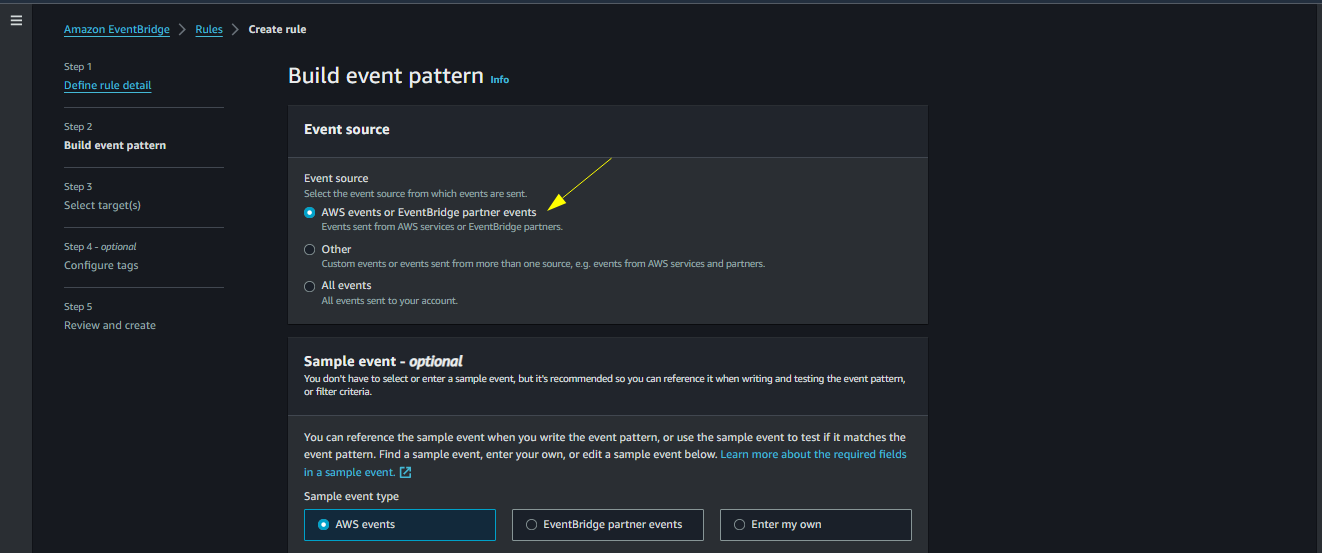
Let Event source be default
- There is no need for sample event, so leave it
Creating Rule
- There is no need for sample event, so leave it
Under Creation method, choose Use pattern from
- Under Event source choose AWS Services
- Choose EC2 as the service
- Choose EC2 Instance State-change notification in Event type
- Choose Specific state in Event Type Specification 1
- Chooose stopped as the specific state
- Choose the Specific instance Id(s)
- Paste the instance id that can be obtained from the EC2 instance page

Creating Rule
Click Next

Click Next
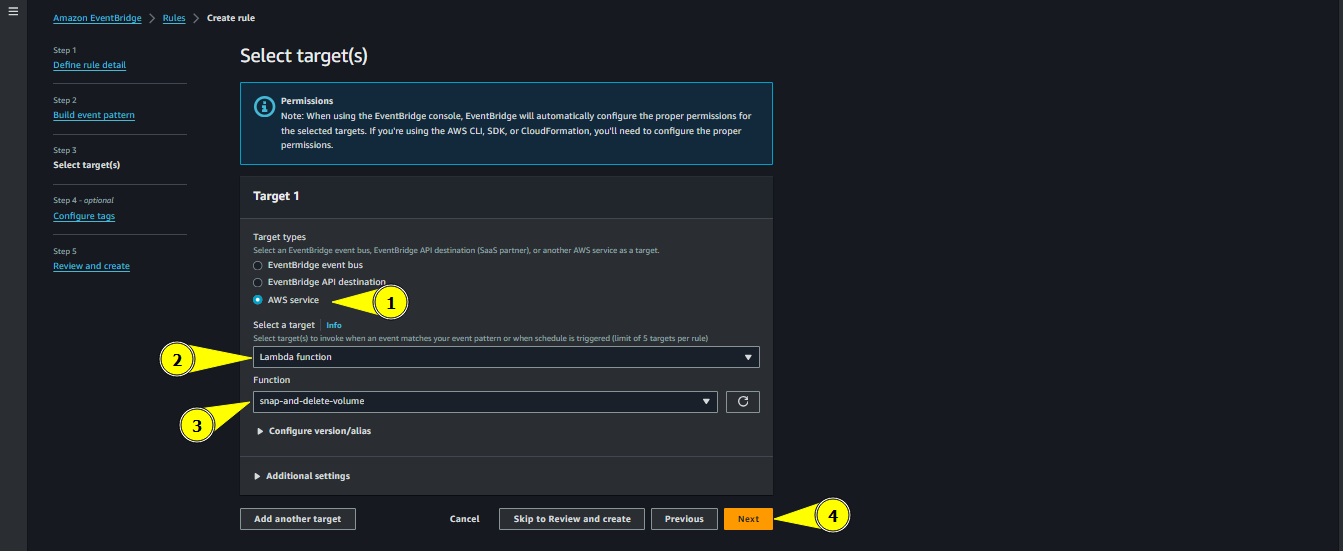
Choose Target Types as AWS Service
- Select target as the Lambda function
- Choose the lambda function we created earlier named snap-and-delete
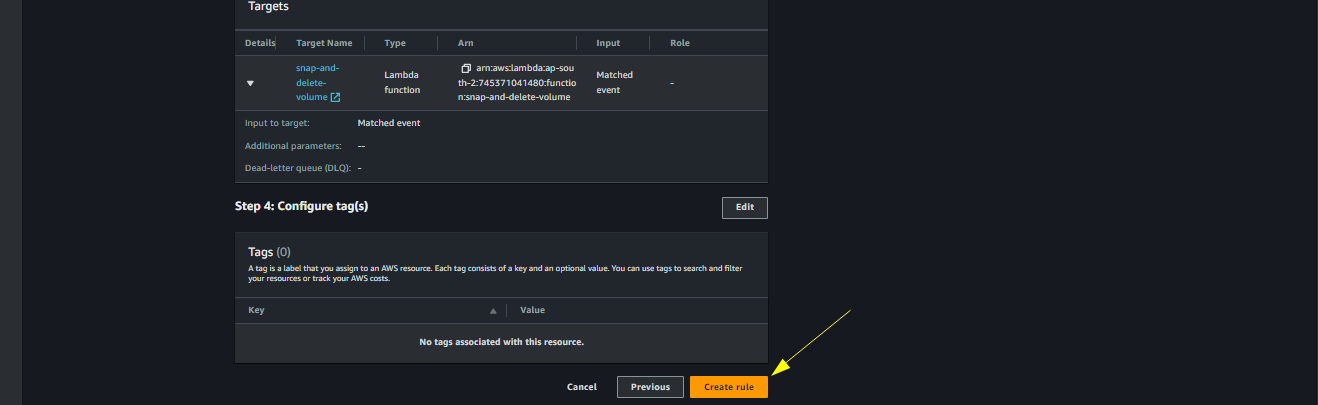
- Configure tags if you want and click next
Choosing Target
Next click Create rule
Create rule button
- Now whenever the instance is stopped, the Eventbridge rule will be satisfied and the lambda will be triggered which will perform its task
- The logs related to the lambda function can be obtained in Log groups section of the Amazon Cloudwatch Service page
Navigate to Amazon Cloudwatch service page

Cloudwatch Service Page
Click on Log groups

Choose Log groups
There will be a log group named /aws/lambda/snap-and-delete. Click on it
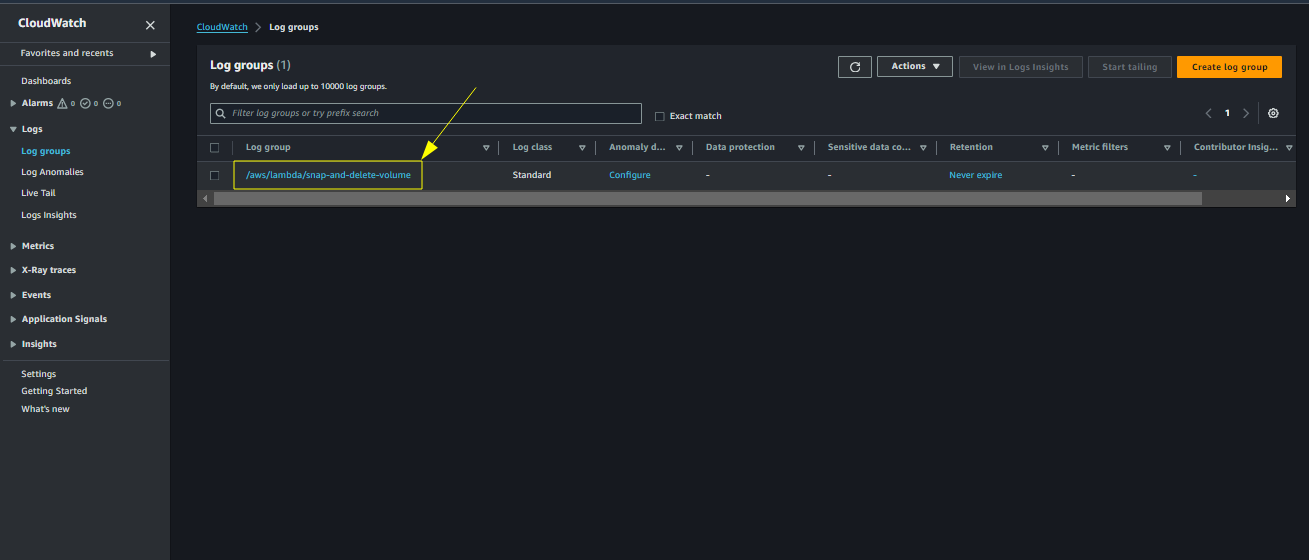
Choose the log group
It will list all the streams. A new stream is generated when the lambda is run. Choose a particular stream
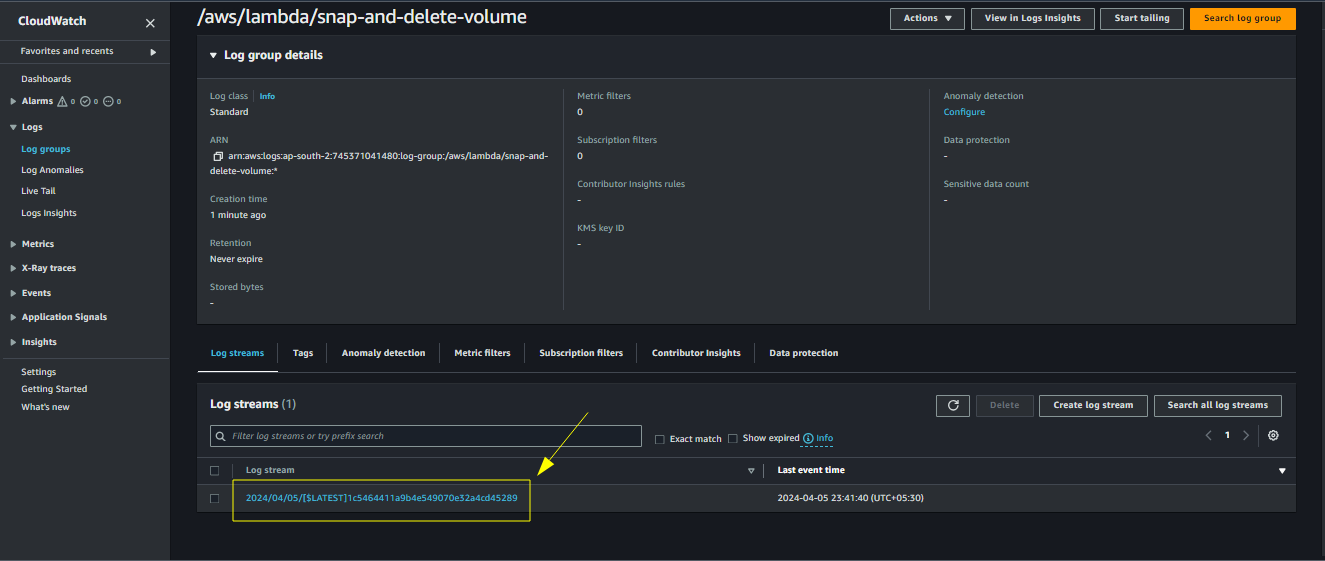
Choose the stream
The log details will be available

Log stream
Create a Volume from Latest Snapshot, attach it and Start the Instance
This section will deal with the steps when the instance needs to be turned on
The lambda function to accomplish these tasks need to be triggered manually. Can also use aws cli if you want
Once the function is triggered, the lambda function will create a volume from the latest snapshot and attach it to the particular instance and then start the instance
Follow the previous steps , only difference is change the name of the function to create-volume-start-instance and choose the existing role as create-volume-start-instance-role
Paste the following code in the Lambda function
- Also dont forget to change the relevant details like
- instance_id
- device_name
- region_name
- Also dont forget to change the relevant details like
			import boto3
import time

ec2_client = boto3.client('ec2', region_name='ap-south-1')
tag_key = 'ghost'
tag_value = 'true'
instance_id = 'your-instance-id'
device_name = '/dev/sda1' # For ubuntu the root device is /dev/sda1. Check for your ami and replace this

def get_instance_availability_zone(instance_id):
    # Describe the instance
    response = ec2_client.describe_instances(InstanceIds=[instance_id])

    # Extract the availability zone from the response
    if 'Reservations' in response and len(response['Reservations']) > 0:
        instance = response['Reservations'][0]['Instances'][0]
        availability_zone = instance['Placement']['AvailabilityZone']
        return availability_zone
    else:
        return None

def get_latest_snapshot_id(ec2_client, tag_key, tag_value):
    response = ec2_client.describe_snapshots(Filters=[{'Name': 'tag:' + tag_key, 'Values': [tag_value]}])

    # Extracting snapshot information
    snapshots = response['Snapshots']

    # Sort snapshots based on start time in descending order
    sorted_snapshots = sorted(snapshots, key=lambda x: x['StartTime'], reverse=True)

    if sorted_snapshots:
        latest_snapshot_id = sorted_snapshots[0]['SnapshotId']
        return latest_snapshot_id
    else:
        return None

    print("Latest SnapshotId is : ",latest_snapshot_id)

def create_volume_from_snapshot(snapshot_id, availability_zone):
    # Create a volume from the snapshot
    volume_response = ec2_client.create_volume(
        SnapshotId=snapshot_id,
        AvailabilityZone=availability_zone,
        TagSpecifications=[
            {
                'ResourceType': 'volume',
                'Tags': [ {'Key': tag_key, 'Value': tag_value}]
            }
        ]
        # Add any other desired parameters here, such as VolumeType or Size
    )
    volume_id = volume_response['VolumeId']
    print("Volume ID is : ",volume_id)
    return volume_id

def wait_until_volume_available(volume_id, ec2_client):
    while True:
        volume_response = ec2_client.describe_volumes(VolumeIds=[volume_id])
        volume_state = volume_response['Volumes'][0]['State']
        if volume_state == 'available':
            print("Volume ID : ",volume_id, "is available")
            break
        print(f"Volume {volume_id} is in state {volume_state}. Waiting...")
        time.sleep(5)

def attach_root_volume(instance_id, volume_id, device_name):
    attach_response = ec2_client.attach_volume(
        Device=device_name,
        InstanceId=instance_id,
        VolumeId=volume_id
    )
    print(attach_response)

def start_ec2_instance(instance_id):
    response = ec2_client.start_instances(
        InstanceIds=[instance_id]
    )
    print(response)

def lambda_handler(event,context):
    snapshot_id = get_latest_snapshot_id(ec2_client, tag_key, tag_value)
    availability_zone = get_instance_availability_zone(instance_id)
    volume_id = create_volume_from_snapshot(snapshot_id,availability_zone)
    wait_until_volume_available(volume_id,ec2_client)
    attach_root_volume(instance_id, volume_id,device_name)
    start_ec2_instance(instance_id)
- The log stream for the above lambda will be like this
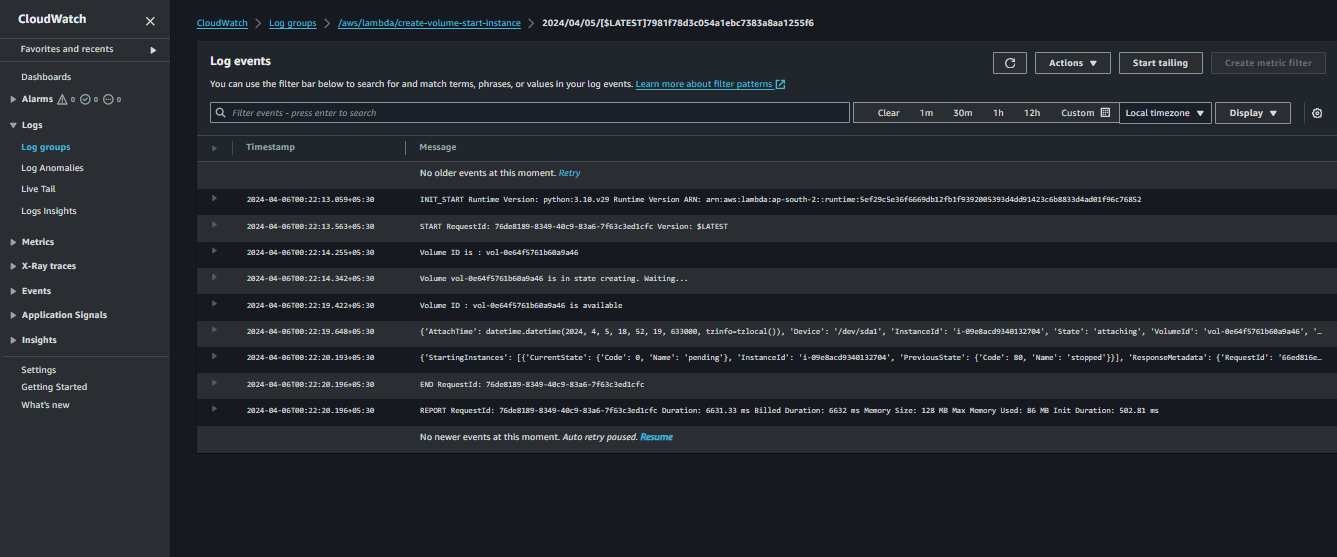
Log stream
Create A record for the public IP of instance in Netlify Records
This section deals with the process of updating the A record of
ghost.yourdomain.comwith the appropriate Public IP of the instance which was started moments agoFollow the previous steps to create the lambda, except change the name of function to create-a-record and use existing role as create-a-record-role
- Paste the following code in the Lambda function
- Change the relevant details like
- domain
- instance_id
- record_name
- Change the relevant details like
			import requests
import boto3
import os

ec2_client = boto3.client('ec2', region_name='ap-south-1')
access_token = os.environ.get('NETLIFY_ACCESS_TOKEN')
domain = "your-domain.com"
instance_id = 'your-instance-id'
record_type = "A"
record_name = "ghost.your-domain.com"

def get_instance_public_ip(instance_id):
    # Describe instance
    response = ec2_client.describe_instances(
        InstanceIds=[instance_id]
    )

    # Extract public IP address
    public_ip = None
    for reservation in response['Reservations']:
        for instance in reservation['Instances']:
            public_ip = instance.get('PublicIpAddress')

    return public_ip

def get_netlify_dns_zone_id(access_token, domain):
    # Define the Netlify API endpoint for DNS zones
    api_endpoint = "https://api.netlify.com/api/v1/dns_zones"

    # Set up headers with authorization
    headers = {
        "Authorization": f"Bearer {access_token}"
    }

    # Send a GET request to retrieve DNS zones
    response = requests.get(api_endpoint, headers=headers)

    # Check if the request was successful
    if response.status_code == 200:
        dns_zones = response.json()
        # Search for the domain and return its DNS zone ID
        for zone in dns_zones:
            if zone['name'] == domain:
                return zone['id']
        print(f"Domain '{domain}' not found in Netlify DNS zones.")
        return zone['id']
    else:
        print(f"Failed to fetch DNS zones. Status code: {response.status_code}")
        return None

def get_record_id(access_token, zone_id, record_type, record_name):
    # Define the Netlify API endpoint for retrieving DNS records
    api_endpoint = f"https://api.netlify.com/api/v1/dns_zones/{zone_id}/dns_records"

    # Set up headers with authorization
    headers = {
        "Authorization": f"Bearer {access_token}"
    }

    # Send a GET request to retrieve DNS records
    response = requests.get(api_endpoint, headers=headers)

    # Check if the request was successful
    if response.status_code == 200:
        dns_records = response.json()
        # Search for the desired record and return its ID
        for record in dns_records:
            if record['type'] == record_type and record['hostname'] == record_name:
                return record['id']
        print(f"Record of type '{record_type}' and name '{record_name}' not found.")
        return None
    else:
        print(f"Failed to fetch DNS records. Status code: {response.status_code}")
        return None

def delete_dns_record(access_token, zone_id, dns_record_id):
    # Define the Netlify API endpoint for deleting a DNS record
    api_endpoint = f"https://api.netlify.com/api/v1/dns_zones/{zone_id}/dns_records/{dns_record_id}"

    # Set up headers with authorization
    headers = {
        "Authorization": f"Bearer {access_token}"
    }

    # Send a DELETE request to delete the DNS record
    response = requests.delete(api_endpoint, headers=headers)

    # Check if the request was successful
    if response.status_code == 204:
        print("DNS record deleted successfully")
    else:
        print(f"Failed to delete DNS record. Status code: {response.status_code}, Error: {response.text}")


def create_a_record(access_token, record_name, zone_id,public_ip):
    # Define the Netlify API endpoint for adding DNS records
    api_endpoint = f"https://api.netlify.com/api/v1/dns_zones/{zone_id}/dns_records"

    # Set up headers with authorization
    headers = {
        "Authorization": f"Bearer {access_token}"
    }

    # Define the payload for creating the A record
    payload = {
        "type": "A",
        "hostname": record_name,
        "value": public_ip
    }

    # Send a POST request to create the A record
    response = requests.post(api_endpoint, headers=headers, json=payload)

    # Check if the request was successful
    if response.status_code == 201:
        print("A record created successfully")
    else:
        print(f"Failed to create A record. Status code: {response.status_code}, Error: {response.text}")

def lambda_handler(event,context):
    public_ip = get_instance_public_ip(instance_id)
    print(f"The public ip of instance-id {instance_id} is {public_ip}")
    zone_id = get_netlify_dns_zone_id(access_token, domain)
    print(f"DNS Zone ID for domain '{domain}': {zone_id}")
    dns_record_id = get_record_id(access_token,zone_id,record_type,record_name)
    print(f"The DNS Record ID of the Record {record_name} is {dns_record_id}")
    delete_dns_record(access_token,zone_id, dns_record_id)
    create_a_record(access_token, record_name,zone_id, public_ip)
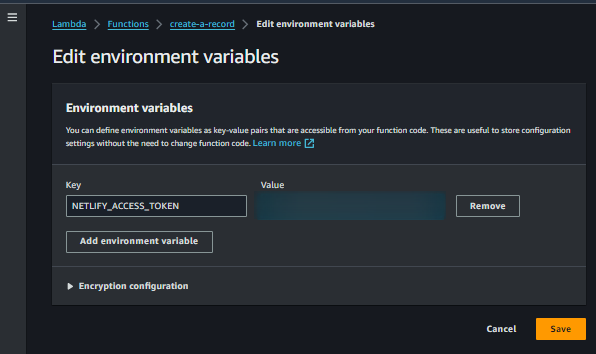
Add Environment variables
We have to add env variables in Lambda since we are relying on NETLIFY_ACCESS_TOKEN which is passed as an environment variable in the code
Choose Environment variables and click Edit

Env1
Click on Add environment variable

Env2
Add the variable NETLIFY_ACCESS_TOKEN with the value obtained from your netlify account
Env3
- Here is how the log stream will look like
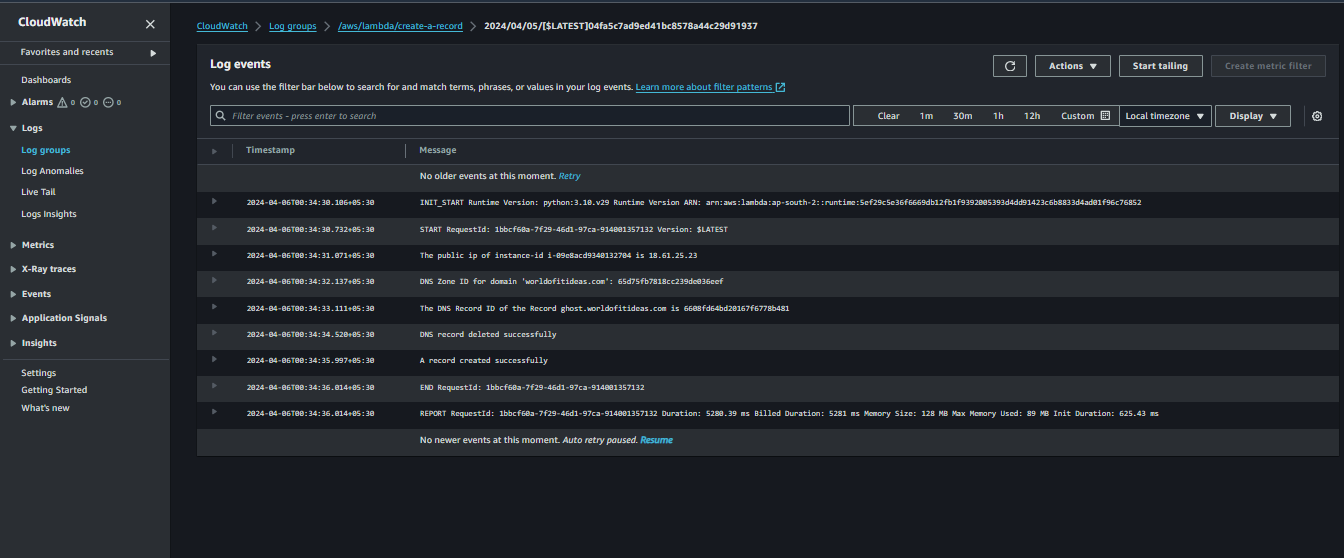
Log stream
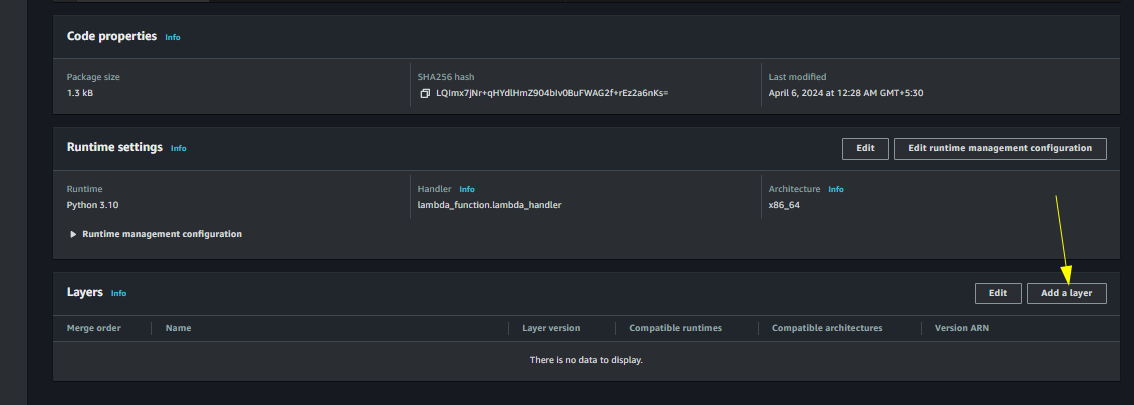
We also need to add layers, because the requests library is not available by default for use in lambda
For more information, refer this blog Layers in Lambda
Navigate to Lambda Service Page
Navigate to Lambda
Navigate to Layers
Navigate to Layers
Click on Create layer button

Create layer button
Create a layer

Create layer
Add the created layer to the lambda function
Click on Layers

Add layer
Scroll down and click on Add a layer
Add layer2
Click on custom layers and select the previously created layer
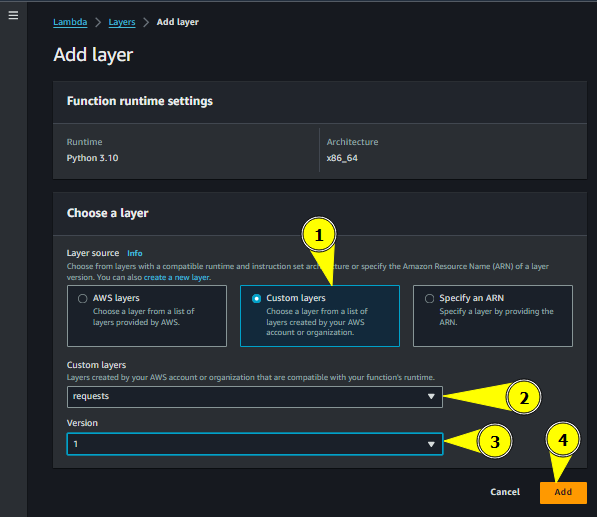
Add layer3
Here we also need to create an Eventbridge rule to trigger this lambda when the instance is started
- Follow the previous steps to create an Eventbridge rule, only difference is
- Change the rule name to ghost-ec2-start
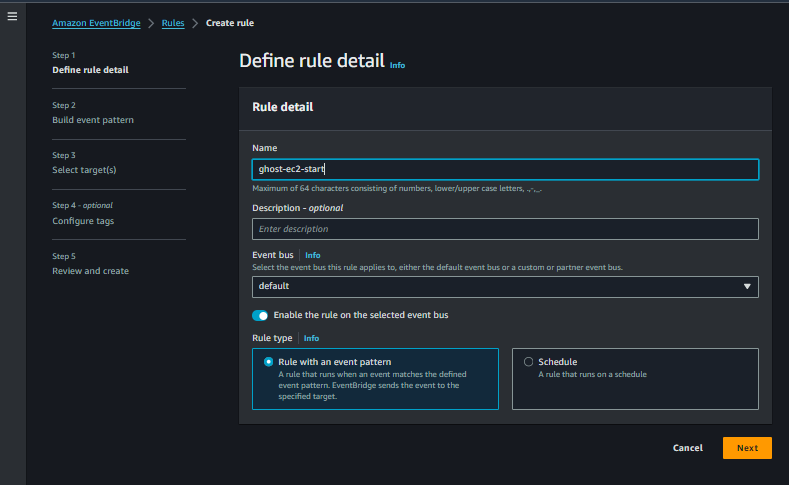
Rule Nmae
- Choose running as the specific state

Details
- Choose the target
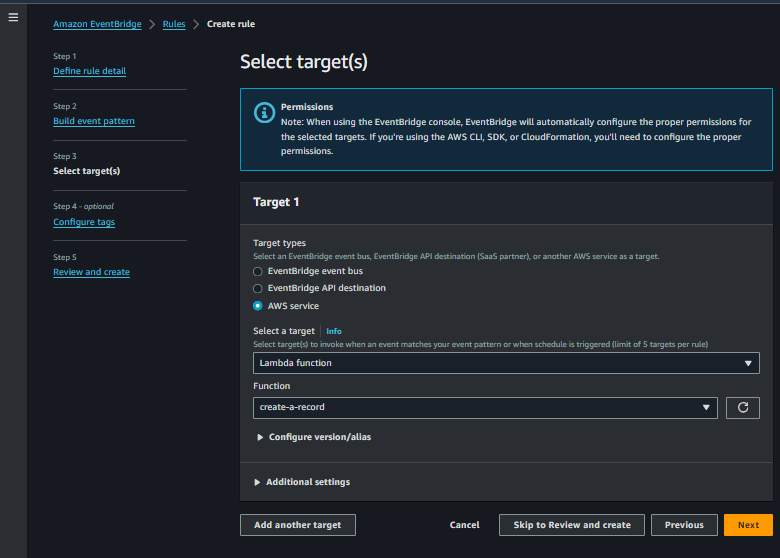
Target
In wrapping up, deploying Ghost CMS on AWS EC2 with a focus on efficiency and cost-effectiveness is within reach. By leveraging AWS services like EC2, Lambda, and CloudWatch, we've outlined a straightforward workflow that ensures your CMS is always available while keeping costs in check.
With snapshots preserving your CMS state and Lambda handling DNS updates, you can rest assured your Ghost CMS deployment is both reliable and resource-conscious. Feel free to explore further customization and optimization as you implement this approach in your own setup.